DropSync Tutorials
Syncing to/from a remote computer
Requirements:- The remote computer must have a version of rsync greater than or equal to 2.6.9. Versions 3.0 or later are preferred. The vast majority of unix/linux and macintosh computers will satisfy this requirement. To find out the version of rsync available on a particular computer type "rsync --version" at the command line (Terminal.app on Mac OSX).
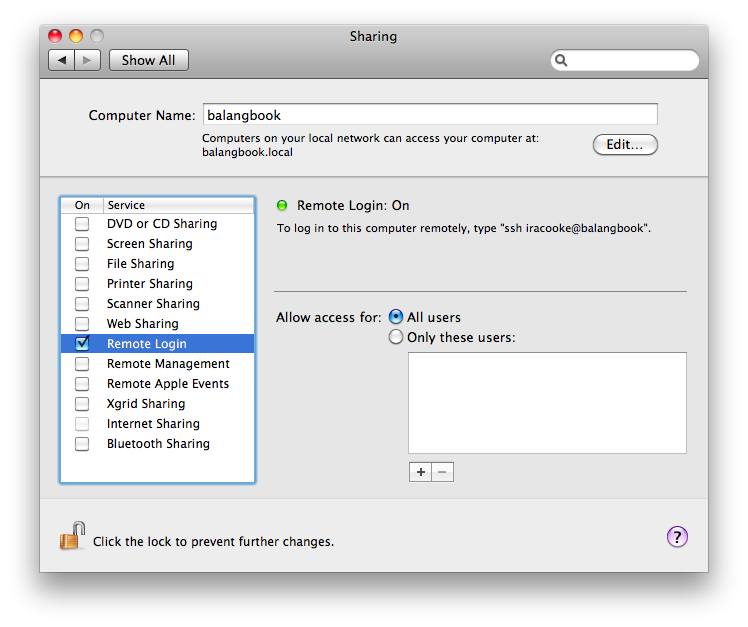
- The remote computer must allow shell access via SSH. A number of web hosting providers allow this as do many computers in academic institutions. Macs running OSX can be accessed via SSH after enabling "Remote Login" under Sharing in "System Preferences" (see below). It is important to be aware that doing this will allow anyone to access the computer remotely if they know it's IP address so be sure that all user accounts on the system have secure passwords.
Setting up the Synced Place:
Select Synced Places > new from the DropSync main menu. This should bring up a screen asking you to name the Synced Place. Give it a simple memorable name and click "Next".
Next select and you should then be presented with a screen asking you to choose how DropSync connects to the Synced Place. Select "Via Remote Login" as shown, and click "Next"

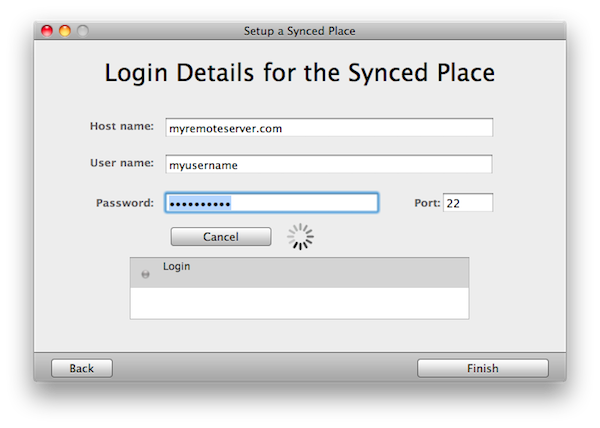
The final step involves entering connection details for the remote server. If you have a remote server setup that allows ssh access you'll be able to access that server using a domain name like (for example) myremoteserver.com or www.myremoteserver.com, or alternatively by using its IP address. For this example imagine we had a remote server that was accessible via ssh under the domain name myremoteserver.com and with a username "myusername". Once you've entered details, including a password for the connection, click "Test" and DropSync will run some checks to see if it can connect properly.
Once you've tested the server and seen that everything works click "Finish" and DropSync will create a new Synced Place. DropSync will connect to the Synced Place and display the remote files on the right hand side
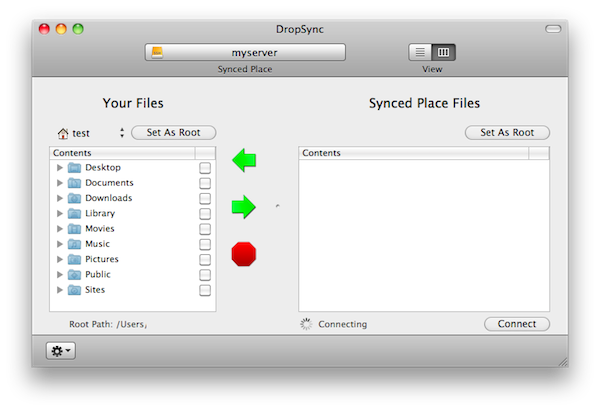
Once connected you should be able to navigate to, and set an appropriate "root" directory and then select items on the remote server, or on your local system for syncing.
Generating the Preview and Performing the Sync:
Once your SSH Synced place has been set-up you should be able to proceed with preview generation and syncing just as for any Synced Place. In the case of a remote server however it is important to be aware that the sync can be interrupted if there is a network failure, or if the server is too slow to respond. DropSync will notify you with error messages if this happens.
Scheduling syncs with iCal and Applescript
Since DropSync is fully scriptable it's syncs can easily be automated and scheduled to run at certain times. The simplest way to set this up is using the "run script" feature of iCal.
Writing the script:
A template script for running a single sync down from a disk called mudflats is shown below. The script code itself is relatively self explanatory. The first line opens the DropSync application if it isn't open already. Then we set a variable called currentStore to the store we want to sync. A Store is equivalent to a Synced place. In this case the store is called "mudflats" and is one we have previously created using the GUI (It's also possible to create stores using AppleScript). The script assumes that a synced place called "mudflats" exists in DropSync so you will need to change "mudflats" in the script to the name of a synced place you have already configured. Subsequent lines initiate a sync in the downward direction and then wait a specified time, or until the sync in completed before quitting DropSync.
(* Running a sync using DropSync and Applescript
Demonstrates how to launch DropSync, select a synced place for syncing, and then run a sync.
DropSync supports much more applescript functionality than is demonstrated here.

Consult the DropSync.sdef file for complete details.

To use this script you will need to modify it to reflect your own setup.
The Applescript Editor utility can be used to run, edit and debug your scripts.

The script can then be run from terminal using the osascript command,
or can be automatically launched by linking it to a recurring event in iCal.
*)


tell application "DropSync"
	launch

	(* Select the synced place (store) the you want to sync by using its name *)
	set currentStore to store named "mudflats"

	(* Initiate the sync in the desired direction *)
	sync currentStore direction Downward

	(* All the steps below are only required if you want to wait
	for the sync to complete and quit DropSync when the sync is finished *)
	set timeused to 0
	set timeoutsecs to 7200 -- 2 hours

	(* Poll every 10 seconds to see if we are complete *)
	repeat until syncing of currentStore is equal to false or timeused > timeoutsecs
		delay 10
		timeused = timeused + 10
	end repeat

	(* Tell Dropsync to quit if it is finished the sync *)
	if syncing of currentStore is equal to false then quit

end tell
Once you've finished editing the template script try running it from Applescript editor. It should open DropSync, perform the desired sync for you and then quit. Once you've got everything working, save the script to a convenient location.
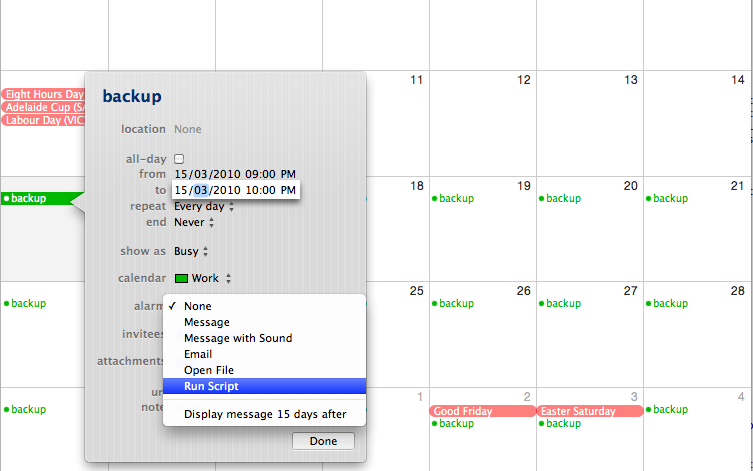
Scheduling the script with iCal:Open iCal and create a new event called "backup" with it's alarm set to run script. This will then open a file window asking you to find the script you want to run. Select the script file created earlier.
To setup a regular backup simply use a repeating iCal event (edit the repeat property of the iCal event in iCal)